d-contenttype
Here you will find instructions for creating, editing and managing the various types of content posted on the Chapter website. Articles appear in the blog, jobs are on the job board, annual conference pages are organized as chapters in a book, and historical items in the timeline have their own unique content type too. The Chapter PIO is responsible for maintaining the website and overseeing all communications. A DropBox cloud storage folder is being used to store content destined for website or e-newsletter distribution. This is a staging area where content (images, documents, messages) can be collected, reformatted as necessary, and the stored in preparation for upload to the web. DropBox makes the content available at home, work, or anywhere with an internet connection. It also contains the Chapter's encrypted passwords archive (no financials.)
Quick Links
- Basic Page
- Blog Articles
- Job Notices
- Slider Images
- Calendar Items
- History Timeline
- Image Galleries
- Books Feature
- Forms
Website Content Types
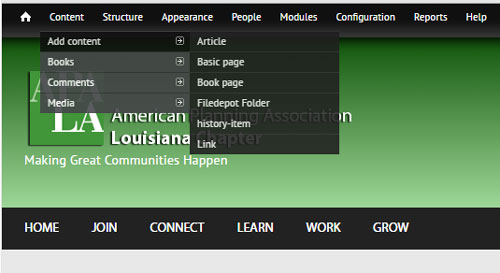 The basic types of content which can be added to the website are described below. The screenshot at right shows the Drupal administration menu and lists the Drupal content types that can be added to the website. This is not all-inclusive, as an article in the blog can include other types of content such as images, links to documents for download, or others.
Basic Page - is a static, "web page" where content is divided into "block" areas. You can add text, place images, and embed other media into a basic page. Also, basic pages can be set as the "target" of other content displayed in blocks - such as sidebar and footer items.
Article - is a news post about an event, activity, or issue which is of relevance to members. Articles are blog entries. The 3 most recent articles are displayed on the site homepage. Others are available for viewing on the unnamed "blog feed" page which is accessible from clicking the "More" button on the home page.
Book Page - is a hybrid between an article and a basic page. Certain sections of this website are defined as "books". Namely, each Section page and the Conferences page. Think of a "book page" as an entry or chapter within a book. This ensures that book pages pertinent to the Acadiana Section appear only under the Acadiana Section main page. It facilitates editing and posting of content by non-techies.
Basic Page
A basic page is simply a blank webpage within the website. It can be included in the menu system but not necessarily. Specific areas of the page - such as sidebars or the banner area - can include containerized content displayed through "blocks". This is a Drupal concept largely beyond the scope of this "how to." The page can be edited through the WYSIWYG editor (CKeditor) or as HTML code, or even as PHP code (again, PHP is beyond the scope here.) Please refer to the "Stylesheet-Theme" section of this documentation for typography styles, unique page layouts (multi-columns), and cool effects with CSS classes. These CSS classes provide formatting and effects beyond what is displayed in the WYSIWYG editor buttons and typically require a little HTML coding. Don't worry - you can copy from examples in the theme documentation..
Aside from text, other content can be added to or embed into a basic page. This includes images (hosted locally within the CMS) and iframes which display external content such as Google calendars, Google maps, YouTube videos, or similar content pulled from external sources.
Responsive Design is a key reason this Drupal framework and Corporate Clean theme were selected. "Responsiveness" allows web content to be legibly displayed on a wide variety of screen sizes. Perhaps not "mobile-first", it is none-the-less mobile device friendly. Unfortunately, it is quite easy to accidentally "break" the responsive behavior of web pages and blog articles when images or iframes are incorrectly inserted. This happens when width and height dimensions are inadvertently "hard coded" into the HTML.
Responsive Image Fix
- First, you should try to right-size (in pixels) the image before you attempt to upload and insert it into the webpage. This is prevention. Today's smartphones take photos that are far too large to post on a web page unedited.Realize that maximum width of the display area of a web page within this CMS is only about 620 pixels. Images having widths greater than 620px is overkill (except when you want to place a thumbnail which users click to view a higher resolution version.)
- If you intend for the image to "float" left or right of associated text, well then you know it's maximum width should be no greater than half of 620px to allow some room for text and for a 10px white-space buffer.
- Suppose you've inserted a right-sized image and applied text wrap to "float" the text around the image, yet the image does not scale responsively in both dimensions when viewed on smaller screens.
- Re-enter page editing mode
- Double-click the image to open the image dialog box.
- Click the Advanced tab and examine the contents of the Style code. It probably defines width and height. Solve it by removing all reference to width and setting height to 100%. Notice how the code below (from the screenshot above) pushes the image to the right margin, includes a 10 pixel white-space gap, and wraps text to the left.
float: right; height: 100%; margin-left: 10px; margin-right: 10px;
- If the above results in an image with fills the page width and this is unacceptable, read on...
If you must upload higher resolution images or graphics, insert them into the basic page or article and edit the image style code as follows:
max-width:100%; height:auto
This allows them to fill the width of whatever container they are in - such as the content area of a basic page. If you need them smaller, specify their size, but enclose that in a div container with max-width:100% and height:auto.
Responsive iFrames
Code has been appended to the CSS of the theme to define this new class. Add the iframe to your page, then switch to code view and enclose it in divs like this:
<div class="iframe-rwd"> <iframe width="800" height="500" frameborder="0" scrolling="no" marginheight="0" marginwidth="0" src="https://maps.google.com/link-to-some-content-here"></iframe> </div>
This will enlarge the iframe content proportionately to fill larger browser windows, yet will shrink it proportionately to fit a cellphone.
Additions to this Section
- The text editor interface (CKeditor) - sort of like a wordprocessor, but different.
- Article "Text format" selector (Filtered, Full HTML, Plain Text, or PHP code)
Blog Articles
Blog articles are news stories which begin on the site's home page (3 most recent) and then get cataloged in an archive viewable both by month and also via a graphic timeline. Keyword “tags” may be assigned to each article when created and this can be used to broadly search all articles by topic. This allows the display of a "tag cloud," but its functionality depends on disciplined use of only a few keyword tags. A master list should be created.
Formatting of Articles utilize the tools and features described above for basic pages. One feature of Articles to be aware of is their need for a snippet of descriptive narrative text at the top of the article. The first few lines of this text get displayed on the homepage "blog roll" and are followed by a "Read More" button which must be clicked by the site visitor to read the entire article. It is intuitive that these first few sentences must be interesting, concise, and capture the readers attention.
Each blog article has a unique image which is displayed as a thumbnail along with the article. Additional images may be placed within the body of the article, but only this associated image is displayed in the blog roll. It should be "right-sized" using Photoshop or similar prior to uploading - max. width 600px. Square or landscape oriented rectangles are preferred.
Collectively, the articles posted to a blog become an element within the website's RSS feed. RSS stands for "Rich Site Summary" and sometimes called "Really Simple Syndication" because it broadcasts frequently updated information. The RSS feed from louisianaplanning.com can be subscribed to via a newsreader, and it also is configured to flow automatically to our Facebook and Twitter social media accounts. This is NOT true of our emailed newsletters issued through MailChimp.
Job Notices
Job notices are not a unique content type and there is no "job management system." Jobs are simply listed on the website "Work" page as plain text bulleted items, most recent on top, and linked to PDF versions of the employer advertisement which is stored within the CMS using Filedepot. So, you first turn the job ad into a PDF and upload it, then edit the Work page to add a link.
- Convert the job description advertisement into a PDF. Save it to Dropbox:
\APA-LA\louisianaplanning.com\_new_content\jobs
Filename should be brief but should include City or Agency name. Prefer use of underscores or dashes (“_” or “-“) instead of spaces in PDF filename. - Login to louisianaplanning.com\site\user or visit the homepage and click the "login" link in the footer.
- Upload the job advertisement in PDF format to the Filedepot “Jobs” folder. Copy the download link to clipboard.
- Navigate to the “Work” page and enter editing mode.
- Add a new line at top of jobs list for most recent entry. Type a job title and location, mimicking format of previous entries.
- Select job title, click the link button, and paste the URL from clipboard memory (copied from the Filedepot item.) Set the link target to “new window”.
- Save Work page. You're done.
Slider Images
The homepage image slider is handled by a Drupal module called Nivo slider. It works, but ain’t the most user-friendly back-end to use.
- Standard size of slider images is 936 x 250. Prepare in Photoshop or similar open source image editor.
- Add the image by logging into louisianaplanning.com; click Modules, scroll down to “other” and open that tab, find Nivo-slider and click configure. (Or, from the Admin menu select Structure -> NivoSlider.)
- Upload the new slider image at top of page; click save configuration button. Then re-enter configure dialog and find the blank (nameless) entry in the list – this is what you just uploaded. Click it and add title and description. Consider adding a link to a specific page or blog article within the website. Again, click save configuration button.
- Tell Nivo Slider module which page you want it to appear on such as <front> or perhaps a specific annual conference page: conference2015. The page name is determined by the "URL Path Settings" tab when that page is in editing mode.
- Again, click save. Make sure the image is set to appear; and consider deactivating an older homepage (<front>) slider image. You should have no more than 4 active at a time.
- Check your work by visiting the website homepage. If something is amiss go back to configure the NivoSlider module again.
The Corporate Clean theme came with a hard-coded homepage slider, but it is too arcane to modify content and cannot be done within the CMS environment. For this reason it is deactivated and we use NivoSlider instead.
Calendar Items
All calendar items are entered and managed within Google Calendar. Use the webmaster@louisianaplanning.com username for access to the main account. There are also four individual Section calendars (accounts) and an AICP professional development calendar account. Each Section calendar may be edited independently by the Section Director, and all are automatically displayed through the website calendar page and homepage agenda sidebar with no further effort.
History Timeline
Our Chapter Historian has provided an overview of events and personalities as an onscreen presentation. Within the history section of this website we have attempted to display this and other key events in a web-friendly format supplemented by events of significance to planners nationally such as the passage of legislation.
www.louisianaplanning.com/site/history-timeline
A history item appears in the vertical timeline displayed by the Chapter History Timeline page. These items are distinct from normal Drupal Articles (blog content) and they require the following information to appear correctly:
- Short title (History-Item)
- Description narrative (Body)
- Date (month/year formatted as xx/xxxx)
- Tag: Louisiana Chapter, National APA, UNO, legislation, plan adoption, incident or miscellaneous
- Image, often selected from specific logo icons for Chapter, National APA, or government (State or Federal) events.
- Text Format of body set to "Filtered HTML"
To Do:
- Add history items for national environmental legislation and create a logo-icon to accompany them.
Image Galleries
A module called Brilliant Gallery is used to display galleries of image thumbnails in a variety of album styles. Images are uploaded by FTP to a specific folder on the host. The image gallery is then “hard coded” into the desired web page using a simple single line of HTML syntax enclosed in brackets. The beauty of using Brilliant Gallery is threefold: 1) You can batch upload a bunch of related photos to a single gallery quickly at full resolution, 2) no need to downsample images prior to uploading, and 3) easy control over the size and arrangement of thumbnails on your page. Plus, the gallery does not break the responsive site design.
Syntax
Use the name of the album to display all images within it with the bg| code enclosed in brackets.
"open bracket" bg|foldername/path "close bracket"
"open bracket" bg|history/Jane_Brooks_presentation|0|45"close bracket"
events/conf2015/venue - the Hilton
events/conf2015/mobileworkshops/celtic
events/conf2015/mobileworkshops/ddd
events/conf2015/mobileworkshops/govt_st
events/conf2015/mobileworkshops/osbr
events/conf2015/mobileworkshops/port
events/conf2015/pics - day of event pics
Brilliant Gallery Documentation by developer
You can override many of the default settings using the full tag:
"open bracket" bg|path/to/your/gallery/folder/without/wrapping/slashes|columns|width-max-pixels|sort-or-random|max-pic-number-to-show|color-override|begin-from-num|caption-yes-no-text "close bracket"
The file path in your bg| code begins with the name of the subfolder inside of "albums". Prior to uploading, you should batch downsample your images to a web-friendly size - certainly no greater than 1024 px wide. Also, to see a listing of existing image galleries, use the Drupal menu to visit Configuration > Brilliant gallery > Manage galleries . You can even selectively hide specific images from display using this interface.
There is also a module enabling the inclusion of a Google+ photo gallery or stream. I haven't used it, but it could make use of image collections already uploaded to the Chapter's Google Photos account.
Special Website Sections
Books: Conferences, Sections, Awards
"Book Page" is a content type slightly different from "Basic Page".
A Drupal module called “Books” has been installed which allows the creation of subsections within the website framework. Each book keeps track of all of it's chapters and contents automatically. For example, “Conferences” is a book and each year I add a new “chapter” for 2015, 2016, 2017… Each chapter (conference year) can have multiple pages covering topics such as session topics, registration, sponsorships, etc.
Similarly, Sections is a book having four chapters: Acadiana, Capital, Metro New Orleans and North Louisiana. The purpose of using this feature is that each chapter can have numerous pages of related content, yet all be organized within the chapter – and all of the chapters collected within the book. Links, breadcrumbs and all of that are handled automatically. Sweet!
Awards has been targeted for similar treatment. Presently, this topic area is too simple and somewhat disorganized. There is confusion about whether annual awards should be associated with a conference, or grouped within an awards section. This deserves further study and resolution.
WebForms is a hugely popular Drupal module with lots of flexibility and features, broadened greatly by even more extensions. I've added SMTP validation so that the Drupal webform can automatically send an email with the supplied data when each person clicks submit. Usage of forms on this site is very basic. Refer to documentation at the link on the module's name. The outbound SMTP mail goes thru GoDaddy (where this site is hosted), where settings are "localhost" and require no username, password nor encryption. Attempts to send outbound mail through gmail and sendgrid failed - unable to connect to smtp server.


